 Tiếng Việt
 English
A detailed guide on how to install inline cabinet fans correctly, ensuring smooth operation, noise reduction, energy efficiency, and optimal ventilation performance.
I. Introduction to Inline Cabinet Fans
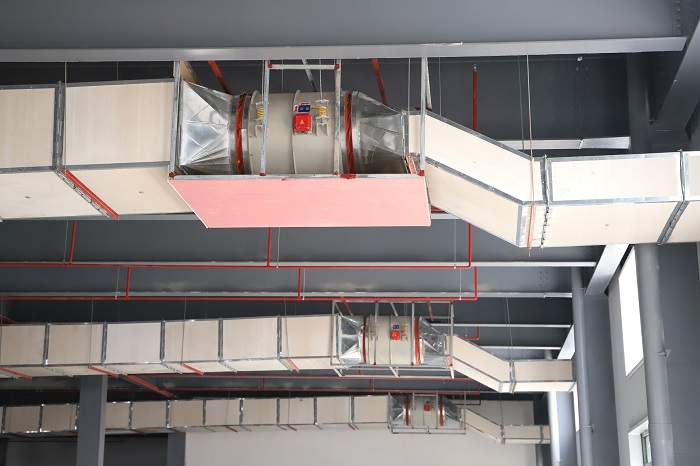
Inline cabinet fans are concealed ceiling-mounted ventilation devices widely used in offices, restaurants, shopping malls, and industrial facilities. Their key advantages include compact design, easy concealment within ceiling spaces, quiet operation, and strong static pressure, enabling uniform airflow throughout duct systems.
However, to ensure stable operation, long service life, and effective noise reduction, proper installation is mandatory. Below is a step-by-step installation guide developed by TOMECO engineers.
II. Pre-Installation Preparation
1. Equipment and accessory inspection
Before installation, verify:
Fan model and airflow direction (intake / exhaust)
Rated power and voltage
Included accessories: duct flanges, mounting brackets, anti-vibration rubber pads, electrical cables, and backdraft damper (if required)
2. Installation location preparation
Select a position close to the main duct line for convenient connection and maintenance
If installed above a suspended ceiling (gypsum ceiling), reinforce the mounting frame with steel or aluminum to ensure sufficient load capacity
Maintain a minimum clearance of 300 mm between the fan and ceiling to allow maintenance access
3. Required tools
Wrenches, screwdrivers, electric drill, spirit level, measuring tape, angle square
Acoustic insulation materials, electrical insulation tape, safety gloves, and protective goggles
III. Inline Cabinet Fan Installation Procedure
Step 1: Determine airflow direction
Identify the intake and discharge directions based on the arrow marked on the fan casing
The intake side connects to exhaust air or indoor air ducts, while the discharge side directs air outdoors or to fresh air supply zones
Step 2: Secure the mounting frame and fan position
Use dedicated mounting brackets or stainless-steel straps to secure the fan
Install anti-vibration rubber pads at contact points to minimize noise and vibration
Ensure the fan is horizontally level using a spirit level
Step 3: Connect to the duct system
Attach duct flanges to both fan ends using bolts, clamps, or airtight sealant
Ensure airtight duct connections to prevent static pressure loss
For systems with multiple bends, provide a straight duct section 3–5 duct diameters long before and after the fan to maintain airflow efficiency
Step 4: Electrical connection
Disconnect the power supply before wiring
Use cables with proper cross-sectional area and connect according to the manufacturer’s wiring diagram (typically shown on the fan label)
Properly connect the grounding wire (PE) to ensure electrical safety
Step 5: Operational testing
Run the fan under test load for 5–10 minutes
Check:
Correct airflow direction
Absence of abnormal vibration or noise
Stable current within rated limits
If equipped with a VFD or EC motor, adjust speed according to design requirements
IV. Technical Notes for Inline Cabinet Fan Installation
1. Avoid incorrect airflow direction
Incorrect intake/discharge orientation may reduce performance by 20–30% and generate excessive noise.
2. Vibration and noise control
Always use anti-vibration pads at mounting points
Apply acoustic insulation to the outlet duct to limit noise transmission
Avoid direct contact between the fan and ceiling structures
3. Electrical safety and maintenance
Install a dedicated circuit breaker (CB) for each fan
Clean fan impellers and filters (if any) every 3–6 months
Periodically inspect wiring, terminals, and grounding
V. Tips to Optimize Fan Performance and Service Life
Keep duct routes as short and straight as possible
Install backdraft dampers to prevent reverse airflow
Avoid operating fans in excessively humid environments or beyond design temperature limits
For kitchen exhaust or grease-laden environments, increase maintenance frequency to every 2–3 months
VI. Conclusion: Proper Installation – Quiet Operation – High Efficiency
Above is the standard inline cabinet fan installation guide from TOMECO experts. Proper installation ensures:
Maximum ventilation efficiency
Quiet, vibration-free operation
Reduced energy consumption and extended equipment lifespan
TOMECO recommends following these installation guidelines and using genuine accessories to ensure long-term safety, performance, and durability.
Frequently Asked Questions (FAQ)
1. What is the best installation location for an inline cabinet fan?
The fan should be installed near the center of the duct system to distribute airflow evenly. For concealed ceiling installation, the mounting frame must be reinforced to prevent vibration and noise.
2. Is a backdraft damper necessary?
Yes. A backdraft damper prevents reverse airflow and odor backflow when the fan is not operating, especially important for restaurants, industrial kitchens, and restrooms.
3. What is the recommended clearance between the fan and suspended ceiling?
A minimum clearance of 250–300 mm is recommended to allow heat dissipation and maintenance access.
4. Can inline cabinet fans be installed horizontally or vertically?
Yes. Inline cabinet fans can be installed horizontally or vertically depending on duct layout. For vertical installation, ensure reinforced mounting and proper anti-vibration supports.
5. How often should inline cabinet fans be cleaned and maintained?
Recommended maintenance intervals:
Offices, shopping malls: every 6 months
Restaurants, industrial kitchens: every 2–3 months
Cleaning includes impellers, filters, and motor inspection to maintain stable, quiet, and energy-efficient operation.
6. Do inline cabinet fans generate high noise levels?
No. TOMECO inline cabinet fans are designed with sound-insulated casings and centrifugal impellers, reducing noise by up to 15 dB(A) compared to conventional fans.
7. What electrical safety measures are required?
Always disconnect power before wiring
Use a dedicated circuit breaker
Proper grounding (PE) is mandatory
Use cables with correct cross-sectional area as specified by TOMECO
8. How can fan noise be further reduced?
Install anti-vibration rubber mounts
Apply acoustic insulation to outlet ducts
Maintain sufficient clearance from ceiling structures
Periodically check for loose bolts or impeller imbalance
==============
📞 Contact TOMECO for professional consultation, model selection, and project-specific installation guidance.
Northern Vietnam: +84 917 704 186
Southern Vietnam: +84 903 360 078
Technical Service: +84 977 246 853 | +84 945 823 789